Last Updated on May, 2023 by Edison
In this article, I’m going to show you how to dropship from AliExpress and get your Shopify store up and running in no time.
There are three main sections:
- Building a Store on Shopify
- How to Find Great Products
- Ways for You to Promote Your Online Store
What is Dropshipping Model?
Dropshipping is a fulfillment model that gives you the chance to purchase products directly from the manufacturer and ship them to your customers.
In other words, you become a “middleman”. You sell the products without buying high volumes and keeping them in a warehouse.
What are the pros and cons of dropshipping?
Pros
– You don’t have to invest thousands of dollars. With dropshipping, you don’t have to buy the product until the sale is over.
– You don’t need to deal with physical products. You don’t need to keep products in stock, or pay for a warehouse or workers.
– Flexibility.
– Good product selection. You spent time finding the highest quality products.
Cons
– Too many competitors. Since it’s very easy to start many people will open a store and add products at a lower price. In many cases, these merchants might have a terrible design and no customer support but this doesn’t stop customers from comparing prices.
– You don’t have control over the quality of the product.
– Supplier Errors. If the vendor makes a mistake, you still need to take responsibility for it. But there are many ways for you to know if the vendor is correct or if the product is as advertised.
Step #1 Start your 14 days free trial
One of the good things about Shopify is that it gives you a 14-day free trial period. That allows you to get introduced to the platform.
When you click on starting your free trial, you will see a small registration form. You will put there your email address, the password, and your store name.
Finding the perfect name is hard and you can figure that out later.
After you click ‘Create your store’, in a few moments of processing it will lead you to other forms. You will need to add more information like your personal information, country, address, etc.
After you click ‘Next’ you will be redirected to a few basic questions regarding your business.
Answer with the options that fit you.
After you click ‘Enter my store’, you will find yourself in the dashboard of your business.
Step #2 Choose the Theme
There are hundreds of themes on Shopify. You can choose whichever you like and you don’t have to write any line of code. The Premium themes come with more modifications, but you can achieve a good-looking site with a free one.
Click “Customize theme” and then “Explore Free Themes”
Browse through them and choose the one that fits your store type.
Then click “Add to Theme Library”.
Customizing is very simple.
You can customize the header, the body of the web, and the footer in any type of design you want.
You can add a section and rename them related to what you are selling. For example, “Hot Deals”
You can drag and drop the sections in the order that you want.
On the sidebar, you have theme settings.
You can change the website colors, font style, and price format; add/remove social media links, etc.
Step #3 Setting Up Payments
In this step, you will learn to set up payment methods for your clients.
Go to settings –> Payment providers.
If you live in the US, United Kingdom, Australia, Canada, or Puerto Rico you can use “Shopify Payments”. It allows you to accept credit cards directly.
Click on ‘Complete Shopify Payments account setup’…
Fill out all the details of your business, personal, and product information.
Continue filling out your bank, and personal details.
If you are not from one of the countries above, you can go to international payment gateways.
Click this link to find all the payment gateways available for your country.
The most famous ones are “PayPal Express”, “2pcheckout” and “Authorize.net”
If you find yourself struggling with any of the steps, you can contact Shopify support 24/7. They have amazing support and they can walk you through any process you want without a problem.
Step #4 Shipping Settings (Shipping Rates)
Here I’ll show you the process of setting the shipping rates. The product and shipping prices are up to you. This is just an example.
Go to Settings –> Shipping.
There are two ways to set shipping rates:
- Based on weight.
- Based on the subtotal order.
First, delete the shipping rates that are already there.
Go to the ‘Add shipping rate’.
Shipping to the US
For retail shipping (Products over $0.01), choose ‘based on order price’.
In the next form, you have ‘Rate name’. (Displayed at checkout)
Use the name Insured Shipping & Handling.
You can set the shipping rate based on the prices.
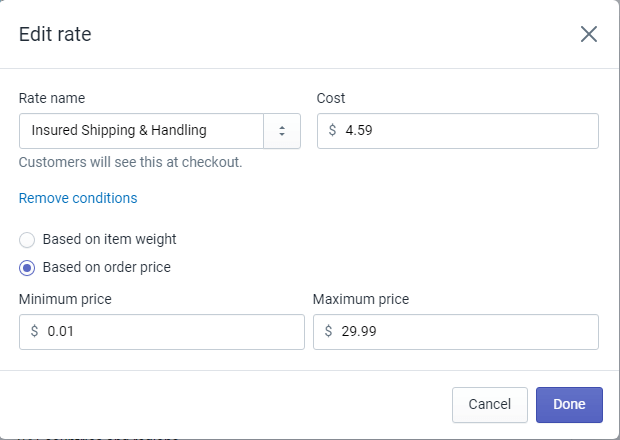
For Example: If a customer buys products from you at that price of $0.01 to $29.99 they will get charged only $4.59
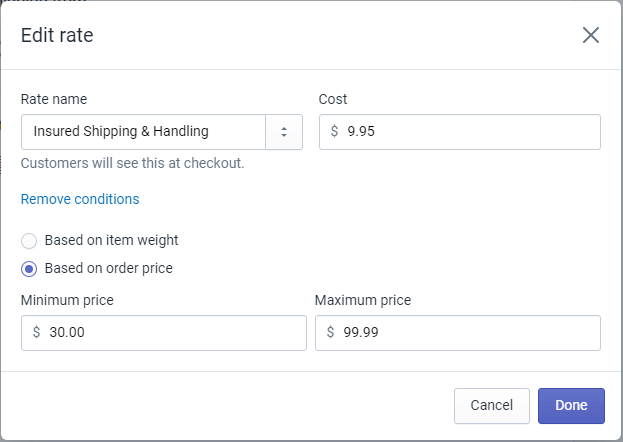
Go to the “add shipping” rate again. For products from $30-$99.99 the shipping rate is going to be $9.95
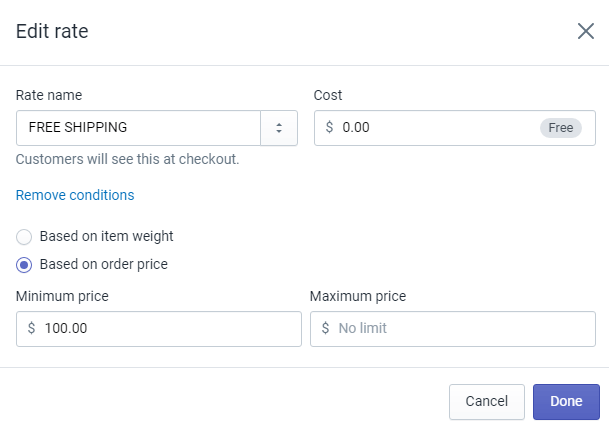
Now, we will set “FREE SHIPPING”
Condition: Based on the order’s price.
So, you set the minimum price of $100.00 and you don’t set a maximum.
Any customer who purchased products with the cost of +$100 will get free shipping. It is a promotional method, which you too can use it.
International Shipping
Let’s add shipping rates for the rest of the world.
Since the shipping is international, the shipping rates are higher.
So, click on the add shipping rate and set the zone “Rest of the world”.
Now, in the shipping name, put the name INTL Insured Shipping & Handling.
The minimum price is $0.01 – $9.99 the shipping rate you can set at $9.95.
It is logical since you are shipping it internationally.
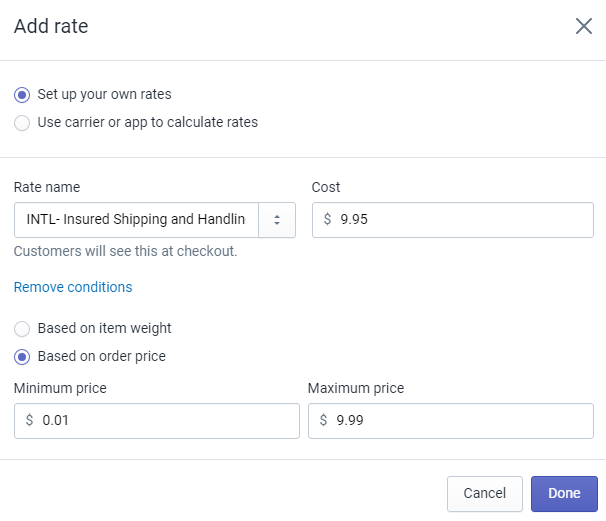
Click ‘Add shipping rate’ again.
If you want to offer free shipping for orders over $100, here’s how to do it:
Choose the option of free shipping.
Set the minimum price to $100.00 and with no maximum price
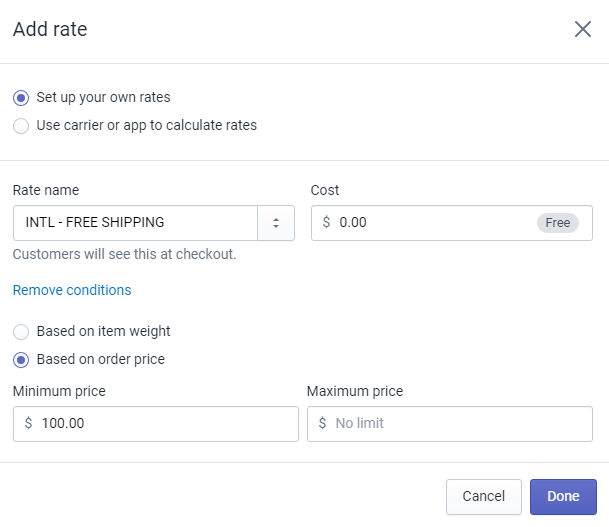
Free + Shipping
It’s when the customer will get the product for free but he has to pay for the shipping.
Go to the ‘Add shipping rate’.
Choose ‘Based on item weight’.
Shipping service name: 1 FREE ITEM – SHIPPING.
Weight: 0.2 lb
For example, if they buy one item, I’ll charge them $11.97 for shipping.
If he buys two products, I’ll give a 2$ discount on the second one.
Then I’ll charge: 11.97 + 9.97 = 21.95
Of course, the shipping price is up to you.
This is just an example to show you how to set up shipping rates correctly.
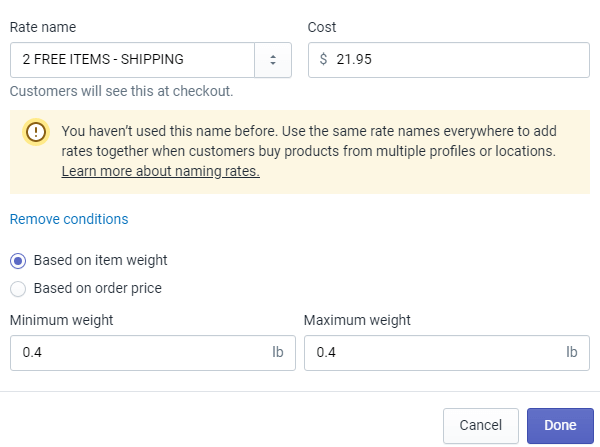
So, for every order, we will add 9.97
If they buy three items, we will charge 21.95 + 9.97 = 31.92 (0.6 lb)
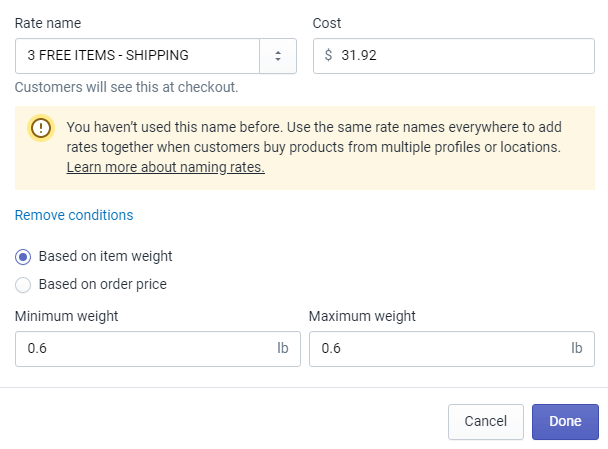
If they buy four items, we will charge 31.92 + 9.97 = 41.89 (0.8 lb)
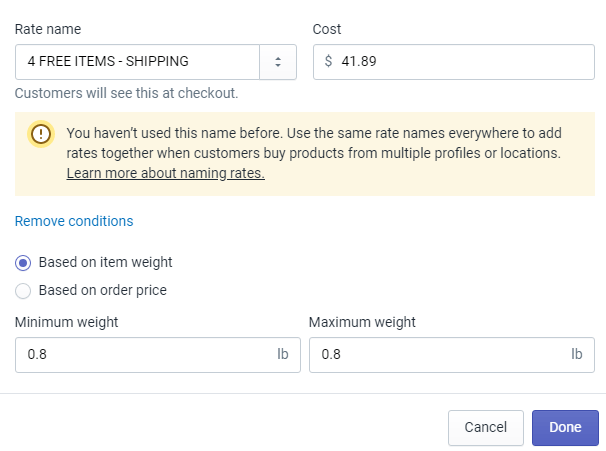
5 items –> 41.89 + 9.97 = 51.86 (1 lb)
6 items –> 51.86 + 9.97 = 61.83 (1.2 lb)
You should do this until you reach 20-25 items. It doesn’t take too much time and it’s crucial to do it.
Remember, you decide the shipping rates.
Make calculations based on the number of products they will buy.
Just imagine what would happen if a customer would order that much, and Shopify would be confused with the shipping rates.
This is also extremely important to know. On your product page:
– All of your retail items weight should be 0.0 lb, so they can be sold based on price.
– All of your free items with shipping rates need to have set the weight to 0.2 lb per item.
It is really important to test it. Go to the product, and click ‘add to the cart’. Put the amount of the free items, for example, 5.
And check if the price was correct.
Step #5 Add Products
Adding products to Shopify is extremely easy.
Title – It’s the name you’ll call a specific product. It should contain valuable keywords.
Description – It includes all the necessary details for the customer to make a decision. Make sure not to copy and paste from the vendor’s site because it will hurt your search engine rankings.
SKU – It’s short for the stock-keeping unit. Each product has a unique identifier in your store. If you are drop shipping then you can leave this empty.
Shipping Options – We explained the shipping details above.
For retail items, the weight should be 0 lb because you are selling based on price.
For “Free + Shipping” items you have to set the weight to 0.2 lb per item because you are selling based on weight.
Variants – You need to offer and specify product variants.
In my example, the product has different colors. And you should set the price for each variant.
It’s also very important to complete the details on the right side.
Step #6 Add a Domain Name
You should buy a domain name because it helps to create a memorable brand.
Click ‘Add Domain” Then “Buy New Domain”
Choose a name that is short, sweet, and catchy. A name that represents what you are trying to sell.
A name that gives you the opportunity to diversify your store. You shouldn’t get locked in one product.
Inspiration cases:
In the beginning, Jeff Bezos called his site “Cadabra” after the word “Abracadabra”.
He was talking about the name on the phone, and the lawyer misheard it as “Cadaver”?
Bezos realized that it was a terrible idea.
Then he tried to call it “Relentless” as a way of saying that they would be relentless in providing the best service.
In the end, they called it Amazon for two reasons:
1. Amazon river is the biggest river in the world and he planned to make his store the biggest bookstore in the world.
2. Since the name begins with “A” it meant that it would be at the top of an alphabetized list.
How did Jack Ma choose the name for his business?
Jack Ma was in San Francisco in a coffee shop and he was thinking Ali Baba is a good name.
Then he asked the waitress, “Do you know about Ali Baba” and she responded, “Open Sesame”.
He asked many people on the street, “Do you know Ali Baba?” People from India, Germany, Tokyo, and China… all knew about it.
Step #7 – Unlock Your Store
When you open the store, it is locked to the public. They can’t check into your store without the password. But there is no problem. Before you unlock it, take the time to finish up the store – adding the products, the shipping rates, finishing the design, etc.
Go to the dashboard, and on the sidebar click “Online Store”.
You will see a message in yellow that tells you that your store is password-protected.
Click Disable Password.
It will redirect you to the password page.
If you are still on the free trial period means the password hasn’t yet been removed.
There is a green message box that says: “To disable your password page, you need to pick a plan”.
Pick a plan. Don’t worry about it; you are not going to be charged until your free trial is over.
Step #8 Install the Best Shopify Apps
Click Apps on the dashboard, then visit the app store.
You will see all the apps that will supercharge your website.
Loox – Photo Reviews – It’s a very useful app. We know that most customers look at product reviews before buying. It imports the top reviews from AliExpress to your store. And it can be of great help especially if you are just starting out.
Price: $9.99/month 14-day free trial
VITALS 40+ apps into one – It helps to improve page speed. When you install many apps, the loading speed increases. And consider these facts about how loading speed affects your profit:
– 47% of consumers expect a web page to load in 2 seconds or fewer.
– 40% of people abandon a website that takes over 3 seconds to load
– A 1-second delay in page response can cause a 7% reduction in conversions
Abandonment Protector – Cart Abandoners are the clients that proceed to checkout but because of many reasons, they don’t continue. You have probably done this before… Went to the checkout, your phone rang, something urgent comes up and you leave it unfinished.
So what this app does?
- Re-engages customers that abandon the checkout
- Saves the items they had in their cart
- The average recovery rate of 2-3%
This app is a must-have if you have hundreds of customers visiting and buying in your store a day.
Price: $8/month, 30-day free trial
Ultimate sales boost – It has a lot of features packed into one. If you want to create scarcity, urgency, social proof, and upsells then you should include this app. For example, here it shows a countdown timer which creates a feeling of urgency.
Or, you can include the “low inventory warning” to create scarcity.
Facebook Chat – It installs a live chat service to your store that is handled by Facebook Messenger.
Shopzie – Shopzie is very similar to Oberlo. The difference is that it gives you cash back every time you drop-ship a product. AliExpress has an affiliate program and shopzie connects to this program and gives you 6.5% of your money back per order.
Printful – You can create a good deal of custom clothing using Printful. When a customer buys a product, the order is automatically sent to Printful, and they will ship it to them under your brand.
Plugin SEO – SEO it’s a great way to bring customers to your store for free. This app will scan your website and give you a report telling you what you are doing right or wrong.
SEO Image – This app will automatically optimize your images for search engines.
GDPR Cookie Compiler – This app displays a banner about the Cookie Policy.
Now that we have set up the store, we need to find and add products.
How to Find Popular Products
Think for a moment about what products you like. What you would buy?
Well, forget that. Nobody cares what you like. And nobody cares what I like.
You should search for products that are in high demand right now.
There are many ways to find popular products that might sell like crazy for you.
WatchCount – It shows the most popular products on eBay. Choose a category or set a keyword to see how many people watch that product live.
Facebook – Pay attention to Facebook Ads because you can see what others are selling. I suggest adding a Chrome Extension called Turbo Ads.
When It’s On, it will show only Ads.
After choosing your favorite Ad, go to their site and see if they are a Shopify Store. You can see it at the end of their page “Powered by Shopify”.
Then you might want to go to Ad Library to see all their ads.
Facebook Groups or Forums – Try to find groups where people are discussing a particular product.
Google Trends – It shows how much a specific phrase is being searched.
Search for a product and if the interest is low then also the demand is low.
For example, let’s search for smartwatches:
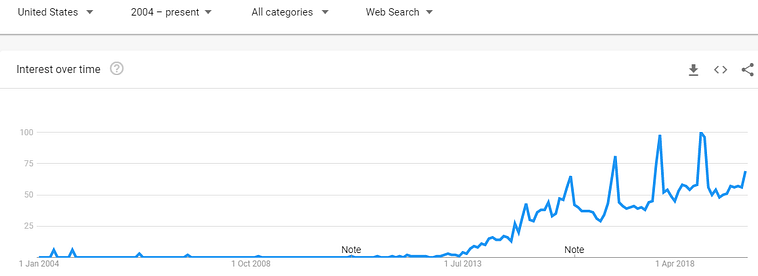
The number of searches has been rising over the years. And December is the peak of making the most sales for this product.
Amazon – Go to Amazon Movers Shakers because it shows the best-selling products in the last 24 hours. Most of the products aren’t suitable for drop shipping but all you need is one product or a great idea. Then you can head over to AliExpress to see if the product is available.
Niche vs Generic Store
Niche – It’s focused on a specific passion.
Pros:
– Easier to develop a social brand because you have more passionate customers. The engagement and conversion are higher than on a generic store.
– Develop a “cult-like” following
– Easier to choose products to market. You have more information in your hands about what your customers like.
Cons:
– It’s harder to scale the business (there is a ceiling). You have a limited amount of products you can offer.
– Start from scratch every time you break into a new niche. It will require more money and time to run the business.
Generic Stores are focused on all niches.
Pros:
– Easier to scale the business (More Revenue)
– You have the flexibility to test any niche/product
– More cost-effective (Less cost for updates/operation)
– Learn while you earn (sell what is selling)
Cons:
– Lower open rates with email marketing
– Less passionate customers (lower conversion rate)
But we can counter it with Niche Facebook Fan Pages.
You can market the product through these FB Pages and include a link to the generic store.
If you are new and just starting out, the generic store is a good option because it allows you to adapt faster. (If a product doesn’t work, you try another)
AliExpress Drop Shipping
There are millions of products on AliExpress and no matter what you want you can find it there.
The products are cheap and the quality is high. The vendors are all from China. They produce huge volumes because of cheap labor and low-cost materials.
Choosing the right Vendors
This is very important because you’re counting on these people to deliver good products on time.
As you get more experienced, you’ll build a relationship with a few vendors whom you trust. You can even negotiate better prices and they might include your logo on the package.
But first, you need to learn how to avoid bad vendors.
There are some indicators you should always pay attention to:
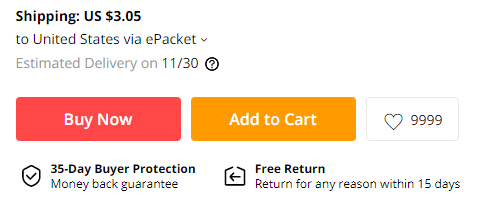
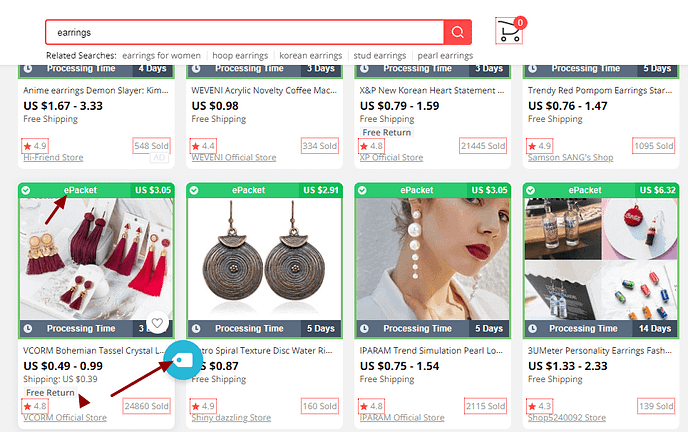
– Check out if they offer ePacket. It’s a faster shipping method between China and the USA.
They usually ship in 15-20 days. Considering it’s coming from China then the time is pretty good.
So, it’s worth spending a little more money for faster shipping and better customer satisfaction.
– Check out “Return Policy,” and “Buyer Protection”.
– Make sure to not include images with celebrities or big brands.
– Don’t work with vendors who have been open for less than a year or when the “item as described” is less than 4.5
– Check out the customer comments. Are they happy with their purchase? What are the ratings?
Some of them will post a picture of a product and that can help you understand if it is a good one.
– There might be other vendors with better prices and better products.
At the end of the page check out “Seller Recommendations”
Let me give you an example of the whole process.
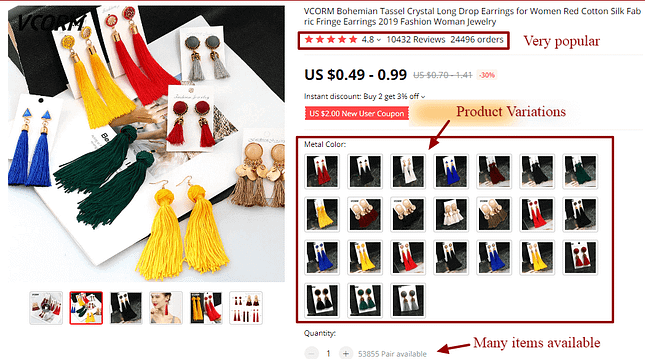
We go to AliExpress and search for a product. And let’s look for Bohemian Earrings.
After finding them, let’s analyze the store. They have been open since Nov 29, 2018; Positive Feedback (97.4%)

You can also instant message the owner. But it depends on where you live because of different time zones.
You can ask them if they can do bulk dropshipping for you.
And they might help you find more winning products.
This is a very popular product. And there are many color variations.
You should always offer products with different variations.
The reason is that the customer might buy two or three products.
There is the ePacket shipping method. It also offers a money-back guarantee and Free Return.
Over 10,000 customers took the time to comment on these earrings. And the comments are mostly nice (89% rated it with 5 stars).
We can also look for images in the comments to see if the product is as advertised.

Bulk Dropshipping
At the end of every day, you create a CVS file with all orders. It helps you save time. You won’t have to order each product one by one.
Follow 5 simple steps:
1. Export order files in CVS from Shopify and email them to the vendor.
2. They will send back an invoice with a payment link
Pay the invoice using Ali Pay or Paypal.
Whether you’re paying for a single product or in bulk, ALWAYS leave this message:
“Please don’t include the price or any advertisements in the package”
Or “Please do not include any promotions in this order because I’m drop shipping”
3. They send the original file back with tracking numbers included.
4. They’ll ship out the items to all of your customers.
Price Negotiation
I showed you how to choose the best vendors and build a relationship with them. And, after selling big amounts of their products, you’ll be in a good position to ask for lower prices.
You can also make them compete for you. You can find another vendor who’s selling the same product at a lower price. Then you can say to your current vendor, “can you beat this price?”
Be confident and tell them how many products you might sell.
There are two things you should consider:
Don’t try to negotiate in the beginning because there is no trust between you two. Unless you show them proof of selling high volumes of similar products.
Don’t be greedy. Asking for big discount prices will put them in an uncomfortable position.
Oberlo App
It’s a Shopify app that makes drop shipping easy.
Following all the steps of adding a product to your store can be time-consuming. You want to do that as quickly as possible so you can spend your time on what actually matters – product research and marketing.
Install the App and the Google Chrome Extension.
Then search for products on AliExpress.
In your store, you can change the name, product description, variants, and price. If all looks good, click “Import to Store”.

PS: If the images contain the watermark, go to the Products page, delete the images, and upload them once again. (After you screenshot them on AliExpress)
PillowProfits
We saw how to sell products from AliExpress at low prices. Or maybe you’ll use the FREE + Shipping method. But, it’s always good to include better products at a higher price. It helps increase the level of trust. And that’s when Pillow Profits comes into play.
They are one of the most innovative fulfilling platforms on Shopify.
They started fulfilling pillows but now they do other products.
Pillow Profits’ headquarters are in New Jersey but they have massive factories in China and they can produce high volume at low prices.
You’ll have access to their products catalog – choose the product and design.
The Express Line allows you to ship the product in a few days for a little more money. It’s very convenient on holidays because people might buy your product as a gift.
Ok, what are some of the tactics to promote your store?
Here I’ll show you some of the best Shopify marketing tactics:
Free + Shipping Products
It’s when you are offering the product for free, but they need to pay for shipping and handling.
On the products page, you put the price of $0.00 And you can write “Get this product for free, just pay for the shipping”.
Try to find very cheap products, with a high perceived value.
When you get into a mall, you’ll see a variety of prices. Those products are probably imported from China, Vietnam, and India, at low prices.
Now, we will do the same thing, but online.
Advertise your product on Facebook and Instagram. Use the word “FREE” on your Ad text to increase the click-through rate. A good thing about this strategy is that it provokes viral traffic through Facebook Ads. If your customers are happy, they will share it with their friends.
It also helps you increase the likes of your FB Page.
Where you can find the products?
Incentive Free Shipping
Many popular stores are using this tactic. It plays on the tendency of people to spend more to save.
How does this tactic work?
We offer free shipping for orders over $50, $70, or $100.
For example, let’s say they add to their cart a T-shirt that costs $25.99 they’ll see a promo that says “spend $50 and get free shipping”. They might buy another shirt with a different color to take advantage of the offer. They’ll spend to save.
Install an App called “Free Shipping Bar”.

Odds are very good that you have a personal Facebook account. Facebook has 2.45 billion active users.
The first thing to do is to create a FB Page for your business. Make it professional and friendly. Explain your business in social and interesting ways.
Every day, post interesting content that is shareable.
Audience Insights
People usually use Facebook to socialize not to shop. That’s why you need to create a laser-focused audience who might be interested in your product. Go to Ad Manager and click “Audience Insights”.
Let’s search for “Charm Bracelet”. We can see that 91% are women. It also shows you their relationship status, education level, and job title.
If you click “Page Likes” it will show you which categories and pages are relevant to this audience.
We can find smaller niches that are more targeted than the road niche.
Affinity shows the relevancy of each subcategory compared to the one you searched for.
Look up those pages to see which is receiving the most engagement, and that’s the one to target.
Facebook Pixel
Pixel collects data about customer behavior in your store. You can plan the Ad campaigns more effectively to find new customers and increase conversion. It’s like Google Analytics on steroids.
It helps you:
– track all traffic to your website
– track conversions
– see different content people are reading on your site
– retarget people who already visited or clicked on your ad or site
It also tells you how much money you have made from your Ad.
The best thing is that as you are driving traffic to your store, the algorithm will get smarter and smarter.
Connecting Shopify with Pixel is easy…
Step #1 Go to Ad Manager –> Pixels
Step #2 Click the first method and Choose “Shopify”
Step #3 Turn on the “Advanced Matching”
Step #4 From here Facebook gives you step-by-step instructions on how to install it.
Setting Up Facebook Campaigns
Go to Ad Manager where you can set up ads under your account. Then click “Create Ad”
We are interested in “Conversions”. But if you are optimizing just for people to make it to your store click “Store Traffic”.
Scroll down and create the ad set.
The first campaign should persuade someone to take action (visit the store, purchase, or just engage with the Ad)
The second campaign should be to re-target those people who didn’t take action.
We are testing the audience and the message.
Here we ask for Facebook to only pay attention to people who are more likely to make a purchase.
Age and Interests – We saw in Audience Insights the age groups and interests.
Try to put yourself in the customer’s shoes. For example, we are selling baby shoes. Who might be interested to buy them? Well, new parents and probably grandmothers.
That’s why we can set the age 25-65+
You can also include education, financial situation, job title, behavior… It’s amazing how much information Facebook has on us.
Remember that the Pixel is constantly learning and after a while, you won’t need to take care of every detail.
Placements – You can choose where your Ad will show up.
Facebook Groups
If you want to grow your Facebook Page for free, follow this strategy:
– Find groups that are related to your niche that allow pages to join them.
– Join several groups and wait to be accepted.
– Once you are accepted post content related to your niche. You can do that by sharing a link from your page.
– After people like your post, you can invite them and Facebook will send them a notification to like your Page
Comment Engagement
You should take the time to respond to comments on your Ad. It helps a lot.
You should also block negative comments about the price or those which include competitor’s links. (Amazon, eBay, Ali, Wish…) We don’t want them to ask for the product and shipping price or say they could find it on Amazon for a cheaper price.
We want them to go to the store and see it for themselves.
The Moderation tool on Facebook can help you with this problem:
1. Go to Page Settings –> General –> Page Moderation and “Edit”
2. Add the Keywords you want to block.
After you read the comments, you’ll know what to hide and you can update this list.
Over 250 million people use Pinterest every month.
Unlike other social networks, Pinterest is primarily product-based.
That’s why it has surpassed Facebook, and search engines to send traffic to online stores.
Another amazing fact is that, unlike Facebook and Twitter posts, pinned images have a long life cycle.
A Facebook post might generate high levels of engagement on the day you published it, but pinned images may resurface weeks, or even months later.
How to drive traffic from Pinterest?
Post long images and don’t be afraid to include the price. In fact, when you use the price tag feature, the pin will be included in the gifts section.
Pinterest might be product-based, but it’s fueled by user interaction.
Show your appreciation for your loyal followers by following them and repining their content.
You can even create a repin board just for their pins.
Don’t just post pictures of your products. Try to find other images such as quotes, memes, and infographics, that your audience might like.
Think of what your followers would enjoy that would also be consistent with your brand.
Include keywords in your image description because it will increase the chances of someone finding your pin.
Content Marketing
It’s one of the best ways to get free traffic.
You create free content that will educate people, provide value, and attract them to your business.
When you are constantly providing valuable insights to your visitors, they’ll be more inclined to buy from you or just spread the word.
According to Business Insider, 23.6% of eCommerce orders are directly tied to organic traffic.
In addition, you need to make sure that the design is simple to use. Customers will spend more time on a site easy to navigate. And the more time customers spend on your site the higher your profit and the higher your content will rank.
Google only cares about good user experience. So, keep that in mind.
Reddit is one of the most popular websites on the internet. Subreddits are communities that have a specific interest. There are over 138,000 active subreddits so your target audience is probably there.
You need to know that Redditors hate marketers. If you try to spam the subreddit with links, your posts will be downvoted as hell. At first, contribute by commenting on other people’s posts.
There are three methods of promoting on Reddit:
1. Reddit Ads.
2. Post a beautiful image of your product and if someone in the comments asks where he can buy it, reply with a link to your store.
3. There are Subreddits that allow you to post links to your products.
Check out:
- r/deals
- r/coupons
- r/reviewmyshopify
- r/shutupandtakemymoney
- r/PromoteYourProduct
- r/iwantthat
- r/Ineedit
- r/freebies
- r/INEEEEDIT
- r/ProductPorn
- r/DidntKnowIWantedThat
They can also give you great ideas for cool products to sell.
Email Marketing
Email Marketing is one of the best ways to promote your products.
Just consider these stats:
– By 2022, it’s predicted that 4.3 billion people will use email. That’s half of the population.
– For every $1 you spent on email marketing you can expect an average return of $32.
– The Average click-to-open rate for all industries is 20.81%
– The average unsubscribe rate is 0.21%
– The best time to send emails to Cart Abandonment Users.
The effectiveness is reduced if you email 24 hours after the shopper has left the site.
– Avoid words such as “free”, “help”, percent off”, and “reminder”, because they negatively affect your open rate.
Email Marketing Tips & Tricks
80/20 Rule – Don’t spam your list by constantly pitching your product. Provide value first by giving a tip, a video, and a story. It will make them feel more connected with you and trust you more.
The rule is to provide 80% value, and then you want to promote something about 20% of the time.
Links – Anytime you email, you need to include a link in the “above the fold” area. It’s the most important area because not everyone will scroll down.
According to a study, 80% of users’ viewing time was spent above the fold. If it is a long email, you need to put 3 or 4 links – above the fold, in the middle, in the end, and in the P.S. section.
How often should you email your list?
Well, there isn’t a definitive answer. According to a survey conducted by Sendgrid, the average send rate was 8.1 times a month.
Scrub your list – The bigger your list gets the more money you’ll spend to pay your email autoresponder each month. But, many people won’t open your email.
On average, 28% of email addresses become unreachable within a 12-month period.
You also don’t have the correct information if your marketing campaign is working.
When they don’t open your emails, is difficult to know what content works and what doesn’t.
It is essential to delete these emails from your list. It’s recommended to delete those who didn’t open your email in the past 6 months.
Best days and times to send emails – Different studies and reviews have shown that the best days are Tuesdays’ and Thursdays. The best times are 8 PM, 2 PM, and 6 AM.
Be Personal – Many marketers make the mistake of being too professional. If you do that, you’ll appear boring. You should write your emails as if you are speaking to one person – as if you’re writing to your best friend. It’ll help you create a connection with your list.
Back up your list and autoresponders – You should always back up your list in case of a sudden data loss.


